Today I want to talk about necks. For many, they are the worst part of making garb. Getting a neck to fit right, front and back, the shoulders right, is not as hard as you might think. It does take some experience and I’ve put all that in. Before I learned a few (hard learned) tips, I made all the mistakes. I made necks that were too large and fell off my shoulders, too high, too low, and just plain uncomfortable. I’ve been there and learned from those mistakes. Tip number one, necks come first. Sew the neck before you sew the sides.
Cutting the Neck: No matter what shape of neck you’re planning, round, square, V neck, keyhole, cut it smaller than you want it to end up. That seam or any other finishing technique you use will take up more fabric than you think. You can always make it larger.
Back necks are always shallower than front necks, especially if the front neck is low. The back has to provide the structure if there is a low neck in the front. But, even if the front neck is high, it’s more comfortable to have the back neck higher. There is more of your neck in front than there is in the back. If you make the back neck too low, it will feel like it’s pulling the whole garment backwards and you’ll always be adjusting it.
If you’re including a contrasting neckpiece, cut the pattern out of paper grocery bags first. That way you can fit the pattern to your neck before you cut it out or redo it easily until it fits your neck properly. Don’t forget to include those seams around the pattern. They’re important.
There are many ways to finish necks on garments. I’m going to go into some simple ones I use and a paper on making contrasting neckpieces. If you are lining your garment, the lining will serve to finish the neckline and any further decoration is embellishment and optional. For those who don’t want to line their garments. I’m one of those. I have enough layers already, thank you. I’m going to talk about how to finish a neckline without lining it.
The easiest way I have found to finish a neckline is to turn it under and finish it off with a simple embroidery stitch called a “blanket stitch”. I find it easiest to machine zigzag around the cut neck before I turn it under. This has two purposes. It keeps the fibers stable and it makes it easier to turn the fabric under using less fabric. It gives your fingers something solid to roll. You can just handsew a rolled neck without the top stitching I do and it will look great. I’m just an embroidery junkie. Just try it on before you finish it to make sure it fits the way you want. I use this technique on all my underdresses.


I’m putting my contrasting neckpiece handout I wrote for a class in here just as it is, so it may repeat some of the neckline tips I’ve discussed. Forgive me. It talks about using the contrasting neckpiece technique (also described as inside out facing) on a keyhole neckpiece, but it can be applied to any shape. I’ve used it on round, V-neck and square necks beside the keyhole neckpiece in the article. In this application, I’ve layered one fabric on top of the other to create the neckpiece you see. So, really, all that limits you is your imagination.
How to Apply Contrasting Necklines By Enid d’Auliere


Neck are hard. What do you do with them? How do you cut them to make them fit? How do you embellish a round neckline? How do you get them to lay properly and look good? I have heard all the questions and am going to show you the answers. It’s easier than you think.
How to cut a neck
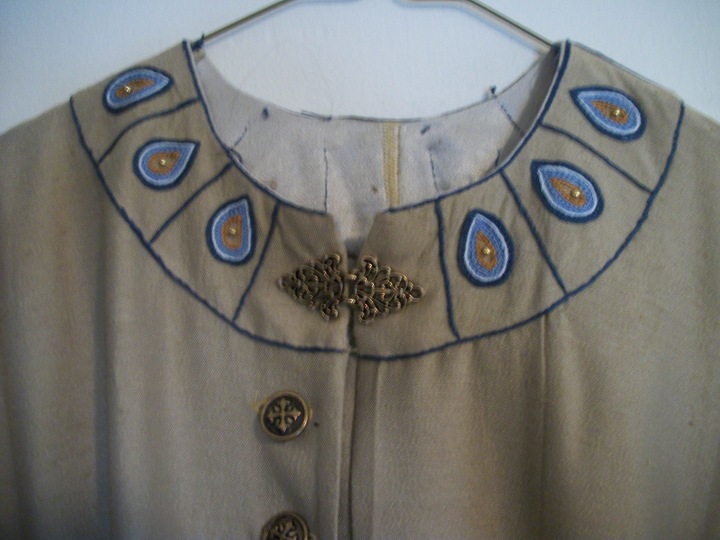
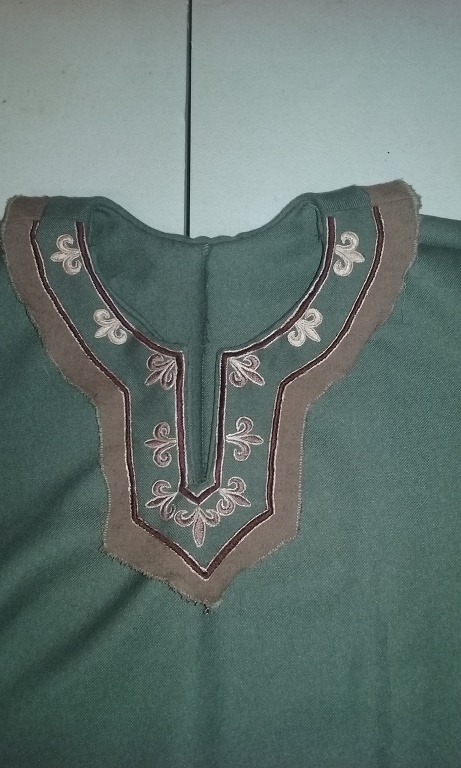
It is important to know how to cut out the neck and shape the shoulders of the garment before you begin. First, the shoulders of the garment always slope down from the neck to the shoulder end. It just fits better. Cutting the neck hole is the trick. Our necks are circular, but they are not a circle. The back neck curve should be shallow and the front curve is much deeper, depending on the individual neck. As you see in the picture above, the back is showing because it is much higher than the front, even in a close fitted neckline such as this. The second important thing to know is to cut the neck hole smaller than the one you want to finish with. The reason for this is simple and twofold. First, the seam to finish the neck will make it larger and Second, it is much easier to make a neck larger than to figure out how to make a large one smaller. I know this from sad experience.
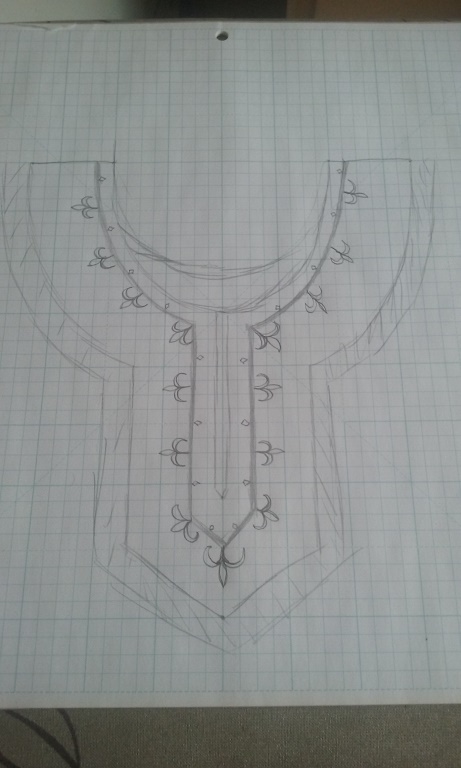
Designing a contrasting neckpiece
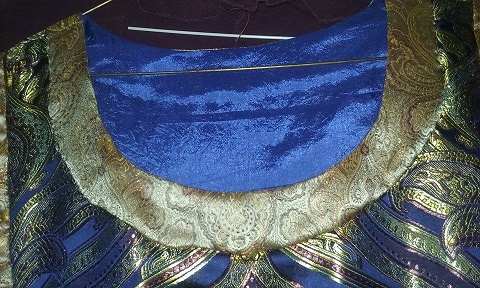
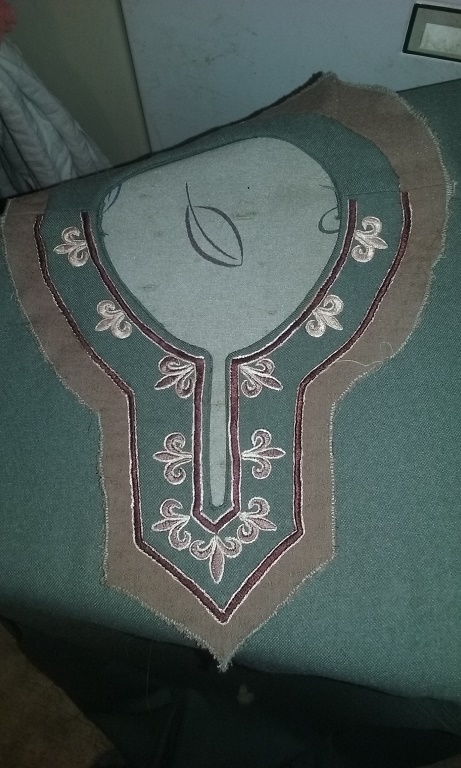
The neckpiece needs to match the curve of the neck in the garment. Begin by drawing the curve of the front neck on paper. Draw another, larger line around that curve for the contrasting neckpiece. Do this for both the front and the back neck. Make sure you include seam allowance on both the inner neck and the outer edge. Measure to make sure the outer line is even with the inner line. You can make this as wide as you want or in any shape you want. It can be round, square, V-shaped, keyhole or any shape you can think up. The neckpiece can be in contrasting fabric to the garment or match the garment fabric (showing off embellishment). It can even be two fabrics, one on top on another as in my example. Just cut one neckpiece larger than the other. What you can do with this type of neckline is only limited to your imagination.
Embellishment is up to the designer. I’m an embroiderer so, having failed to figure out a way to put straight trim on a curved neckline, I resolved to embroider them the way I want them. There are lots of other ways to embellish a neckpiece including, but not limited to, beading, couching and applique. Apply embellishment to the neckpiece before you apply it to the garment. It’s much easier, trust me. In this example, I have cut two neckpieces out, one to be applied on top of the other. In using this technique, I zigzag the edges of the top piece, turn the edges under (snipping where necessary) and hand sew it to the bottom piece before I apply the neckpiece to the garment. That way, when I apply the neckpiece to the garment, I will work with the neckpiece as one application and not two.


Finishing the neckpiece
Zigzag around the outer edges of the neckpiece. This makes it easier to turn under when applied to the garment. If you are doing a double fabric with embellishment as in my example. I hand basted a line around the neckline and into the keyhole as a sewing guide.
Applying the neckpiece to the garment
Pin the neckpiece RIGHT SIDE TO WRONG SIDE of the garment. That way, when you flip it, the right side of the neckpiece will be on top of the right side of the garment. Sew around the neck and keyhole slit. Trim all seams to ¼ inch and make a snip in the corners up to the sewing line. Flip the neckpiece to the front of the garment with the neckseam inside and press down with an iron.


Before pressing
After pressing
Once the neckpiece is attached to the garment and pressed, it is time to finish the outer edges. Turn the outer edge under and pin it to the garment for hand sewing. I sew it down to the garment with an invisible stitch. Often machine sewing about outer edge results in puckering and the neckpiece laying unevenly. Also, it is harder to cover up a machine sewn edge than it is a hand sewn one.


Careful finishing makes the neckpiece look great and it adds a lot to a garment. Hand sewing the edges, making sure the points match and the line is even are all little things that make a difference. Often, I will edge the neckpiece with contrasting embroidery or cording.
However you choose to use this technique for necklines, I know it will be creative and elegant. This technique can be used for either men’s or women’s garb, it finishes a neck so it will last forever and survive multiple washings.
